How to Push a Code to Review in Git Gerrit Repo
Gerrit - Quick Guide
Gerrit - Overview
Gerrit is a spider web based code review tool which is integrated with Git and built on top of Git version command arrangement (helps developers to work together and maintain the history of their work). It allows to merge changes to Git repository when you are done with the code reviews.
Gerrit was developed by Shawn Pearce at Google which is written in Java, Servlet, GWT(Google Web Toolkit). The stable release of Gerrit is 2.12.2 and published on March xi, 2016 licensed under Apache License v2.
Why Employ Gerrit?
Following are certain reasons, why you should use Gerrit.
-
You tin easily find the error in the source code using Gerrit.
-
Y'all tin work with Gerrit, if yous have regular Git client; no demand to install any Gerrit client.
-
Gerrit can be used as an intermediate between developers and git repositories.
Features of Gerrit
-
Gerrit is a costless and an open source Git version command system.
-
The user interface of Gerrit is formed on Google Web Toolkit.
-
It is a lightweight framework for reviewing every commit.
-
Gerrit acts every bit a repository, which allows pushing the lawmaking and creates the review for your commit.
Advantages of Gerrit
-
Gerrit provides access control for Git repositories and web frontend for code review.
-
You can push the code without using boosted control line tools.
-
Gerrit can allow or refuse the permission on the repository level and down to the co-operative level.
-
Gerrit is supported by Eclipse.
Disadvantages of Gerrit
-
Reviewing, verifying and resubmitting the code commits slows downward the time to market place.
-
Gerrit can work only with Git.
-
Gerrit is slow and information technology's not possible to change the sort society in which changes are listed.
-
Yous need ambassador rights to add repository on Gerrit.
Gerrit - Installation
Before you can use Gerrit, yous have to install Git and perform some basic configuration changes. Following are the steps to install Git client on different platforms.
Installation of Git Client
Linux
Y'all can install the Git on Linux by using the software parcel direction tool. For instance, if you are using Fedora, you can apply as −
sudo yum install git
If you lot are using Debian-based distribution such as Ubuntu, then use the following command −
sudo apt-become install git
Windows
You can install Git on Windows by downloading information technology from the Git website. Just become to msysgit.github.io link and click on the download button.
Mac
Git tin exist installed on Mac using the following command −
brew install git
Another way of installing Git is, by downloading it from Git website. Merely become to Git install on Mac link, which will install Git for Mac platform.
Gerrit - Configure Git
Once you have installed Git, you lot demand to customize the configuration variables to add your personal data. Yous tin get and ready the configuration variables by using Git tool called git config along with the -50 option (this option provides the electric current configuration).
git config -l
When you run the in a higher place command, you will go the configuration variables as shown in the following image
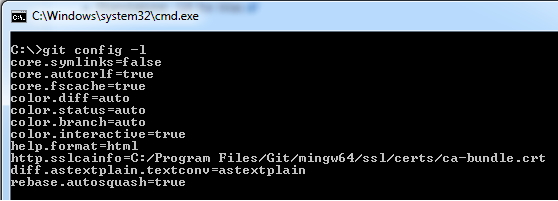
You can change the customized information any time past using the commands again. In the side by side affiliate, you will acquire how to configure the user name and user E-mail by using git config command.
Gerrit - Set Your Username & Email
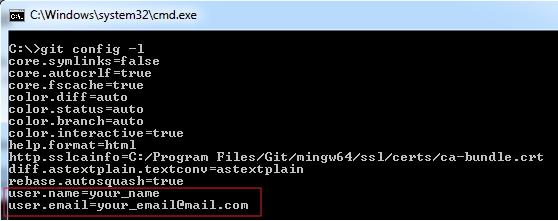
Yous can rails each commit past setting proper noun and electronic mail variables. The name variable specifies the proper noun, while the email variable identifies the email address associated with Git commits. You can set these using the post-obit commands −
git config --global user.email "your_email@mail.com" git config --global user.name "your_name"
When yous run the above commands, you volition become the user name and email address as shown in the following prototype.
Gerrit - Generate New SSH Central
SSH stands for Secure Shell or sometimes Secure Socket Shell protocol used for accessing network services securely from a remote computer. You can set the SSH keys to provide a reliable connectedness betwixt the computer and Gerrit.
You can cheque the existing SSH key on your local estimator using the following command in Git Fustigate −
$ ls ~/.ssh
Afterwards clicking the enter button, yous will see the existing SSH key as shown in the following image −
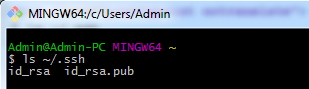
If you don't find any existing SSH key, then you need to create a new SSH fundamental.
Generating New SSH Key
Yous can generate a new SSH primal for hallmark using the following command in Git Bash −
$ ssh-keygen -t rsa -C "your_email@mail service.com"
If yous already have a SSH key, and so don't a generate new key, as they will exist overwritten. You can use ssh-keygen command, only if you take installed Git with Git Bash.
When you run the above control, information technology will create two files in the ~/.ssh directory.
-
~/.ssh/id_rsa − It is private key or identification key.
-
~/.ssh/id_rsa.pub − Information technology is a public tv.
Gerrit - Add Your SSH Cardinal
You lot can add SSH key to the ssh-agent on different platforms discussed further.
Linux
Utilize the post-obit command on Linux organization to add SSH key
true cat /home/<local-user>/.ssh/id_rsa.pub
Windows
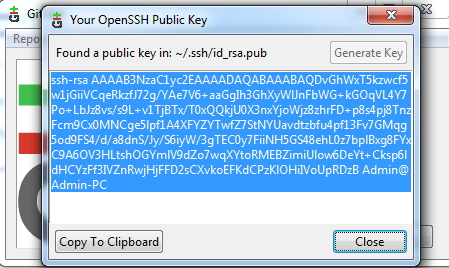
Open the GIT GUI and go to Aid → Prove SSH Key every bit shown in the following image.

Then, click the Copy To Clipboard button, to copy the central to the clipboard.
Mac
In Mac Os X, you tin copy id_rsa.pub contents to the clipboard using the post-obit control.
$ pbcopy < ~/.ssh/id_rsa.pub
Gerrit - Add SSH Primal to your Gerrit Account
SSH key can be added to the Gerrit account using the following steps −
-
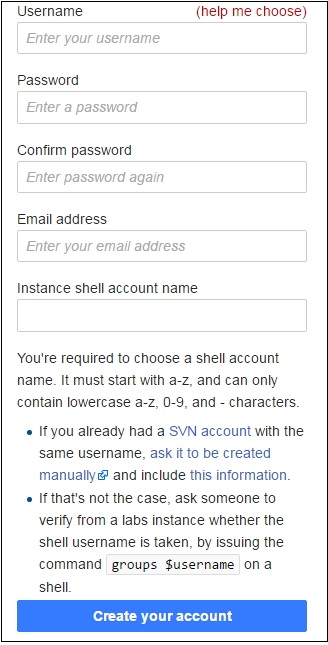
Stride 1 − First create an business relationship at wmflabs.org services.
-
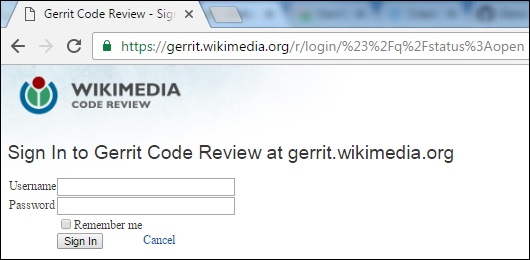
Footstep 2 − Next sign in to the web interface for Gerrit.
-
Footstep three − And then in the top right corner, click your username and select the Settings option.
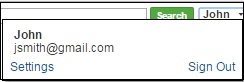
Here, nosotros take created an business relationship with the proper noun John to make use of Gerrit
-
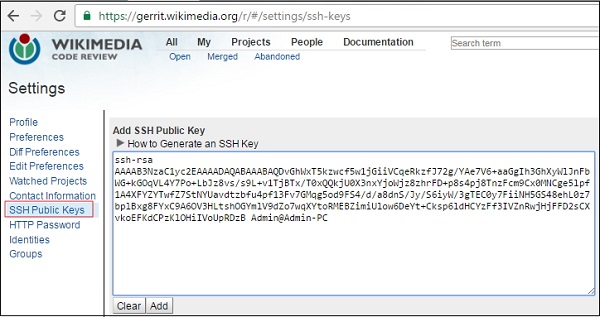
Step four − Click the "SSH Public keys" choice on the left-side menu and paste the SSH Public primal in the field.
Gerrit - Add together SSH Cardinal to use with Git
You can add SSH cardinal to Git using the following commands −
-
Pace i − Open Git Bash and go the ssh-agent using the following command.
$ eval 'ssh-amanuensis'
-
Pace 2 − Next, add the SSH key to the ssh-agent using the following command
$ ssh-add ~/.ssh/id_rsa
-
Step 3 − Now, run the ssh using the following command, which matches the SSH fingerprint used when logging for the first time.
$ ssh -p 29418 <user_name>@gerrit.wikimedia.org
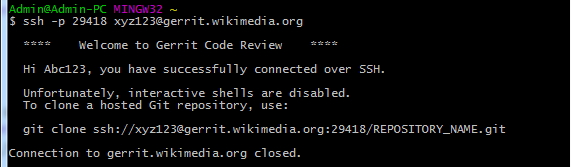
In the above screenshot, you can see that xyz123 is a example trounce account name, which is used while creating Gerrit business relationship and Abc123 is a user name of your Gerrit account.
Gerrit - Download Examples Using Git
You lot tin can download the example using Git forth with the source code of any project organized at gerrit.wikimedia.org using the post-obit Git Fustigate command.
$ git clone ssh://<user_name>@gerrit.wikimedia.org:29418/mediawiki/extensions/examples
The git clone command clones a directory into a new directory; in other words gets a copy of an existing repository. When you lot run the above command, you will become a screenshot similar to the following.

The above command clones the 'examples' repository and receives the objects, files, etc. from that repository and stores it in your local branch.
Gerrit - Installing Git-Review
You can work with Gerrit past installing git-review on different platforms as discussed in this chapter.
Windows
In Windows, you can install the git-review equally listed in the post-obit steps.
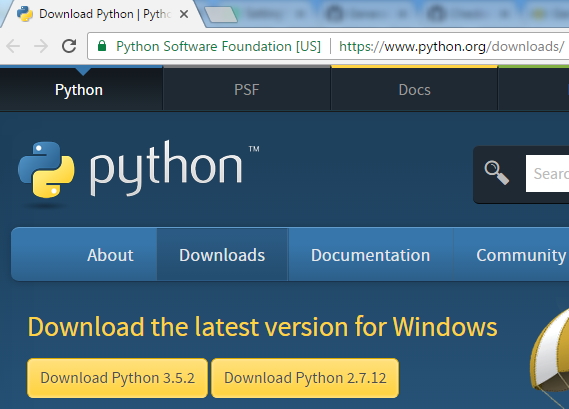
Step i − Beginning install Python for installing git-review.
Stride 2 − Keep the Python installation in the default directory (similar C:\Python27) instead of installing in any other directory.
Pace 3 − Next, ready the environs variables for Python scripts directory using the path as C:\Python27\;C:\Python27\Scripts\;
git_review_install
Footstep iv − With version ii.7, Python will install pip automatically. For older version of Python 2.7, you tin install pip as described in this link.
Step v − Run open up Git Bash and install the git-review using the following command.
$ pip install git-review
Linux
In Linux, you can install git-review as described in the following steps −
Footstep 1 Users of Linux platform practice not have root admission on shared host. Hence, without root access, you lot tin can install git-review locally in user directory using the following commands −
virtualenv --python=/usr/bin/python2.vi virtualenv virtualenv/bin/pip install git-review==1.21
Step 2 − You can extend the path to the local binaries using ii ways −
PATH=$PATH:~/virtualenv/bin/ PATH=~/virtualenv/bin/:$PATH
Step iii − Now, use the post-obit command to set up the work with Gerrit.
git review -south or ~/virtualenv/bin/git-review -southward
Step 4 − With root access, git-review can be installed using the following command.
sudo apt-get install git-review
Pace five − If there is no apt-get after installing Python, then use the following commands.
$ sudo easy_install pip $ sudo pip install git-review==1.21
Step 6 − Run the following command to piece of work with Gerrit.
git review -s
Mac OS 10
In Mac, you can install the git-review using the post-obit steps.
Step 1 − Install the Homebrew from this link.
Pace ii − Next, install the git-review using the following command.
brew install git-review
Gerrit - Configuring Git-Review
Gerrit is congenital on top of Git version command system, which extracts the code from other host, pushing changes to the code, submitting the code for review, etc. The default remote name of Git is origin and we tell git-review to employ this proper noun 'origin' by using the post-obit command.
$ git config --global gitreview.remote origin
Gerrit - Setting Upwardly Git-Review
Git-review can be used to send git branches to Gerrit for reviewing. Yous tin prepare gitreview using the post-obit command in the project directory.
$ git review -south
Git-review can be used as the command line tool for configuring Git clone, submitting the branches to Gerrit, fetching the existing files, etc. Git-review looks for the remote named gerrit for working with Gerrit by default.
If git-review finds the Gerrit remote, and then it volition submit the branch to Head:refs/for/master at the remote location and if there is no Gerrit remote admission, then git-review looks for the .gitreview file at the root of the repository along with the gerrit remote data.
Git-review processes the following internally −
-
Information technology volition check whether the remote repository works or not for submitting the branches.
-
If at that place is no Gerrit remote access, then it volition enquire for the username and try to access the repository again.
-
It will create a remote admission called gerrit that points to Gerrit.
-
It will install the commit-msg claw.
Gerrit - Update Master
You can make the master branch up-to-engagement using the following control. The git-pull control fetches from another local branch or integrates with another repository.
git pull origin master

-
The command will pull changes from the origin remote (URL of remote to fetch from), primary branch and merge the changes to local checked-out branch.
-
The origin master is a buried re-create of the concluding pulled from the origin.
-
Git pull is a combination of git fetch (fetches new commits from the remote repository) and git merge (integrates new commits into local branch).
-
Git pull merges the local branch with the remote co-operative past default.
Gerrit - Create a Branch
You can create a branch on the local motorcar using the following command.
$ git checkout -b name_of_branch origin/master
The to a higher place command creates a new branch as shown in the following screenshot.

Here, we take used branch123 as the new local co-operative. You can show the new co-operative from the 'master' using the following command.
$ git co-operative
The above command produces the upshot as shown in the following screenshot.

Git checkout navigates between the co-operative, updates the files in the working directory, and informs Git to tape the commits on that branch.
Gerrit - Make & Commit Your Change
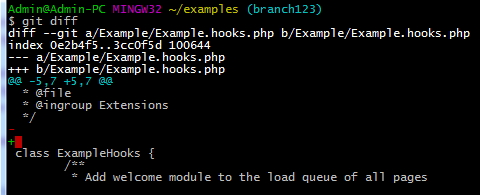
When y'all modify the lawmaking in the local file system, you can check for the changes within the directory using the post-obit command.
$ git diff
In the projection directory, nosotros volition modify some changes in the file called Example/Case.hooks.php and run the above command. We will go the consequence every bit shown in the following screenshot.
You can check the changes made to the files or the directory using the post-obit command.
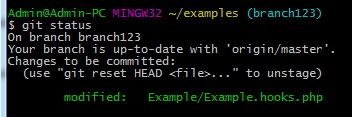
$ git status
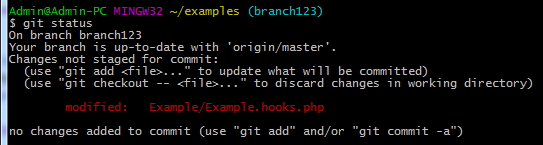
The above command allows to come across which changes accept been staged, which have not, and which files are non tracked past Git.
Side by side, y'all tin can add the changes in the working directory and update the file in the side by side commit using following command.
$ git add together Example/Example.hooks.php
Later on adding the file, again run the git condition command to review the changes added to the staging area as shown in the following screenshot.
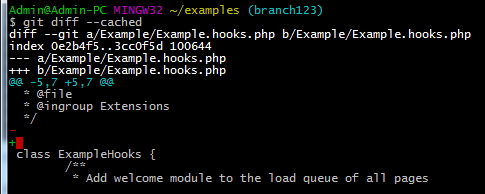
You can see the divergence between the index and your terminal commit, and what contents take been staged, using the following command.
$ git diff --cached
You can push the changes to the remote directory from the local repository using the post-obit command.
$ git commit
When you run the above command, information technology will ask to add the commit message for your changes. This message will be seen by other people when you push button the commit to the other repository.
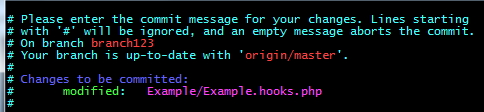
Add together the commit message and run the control again every bit git commit, which will brandish the commit message as shown in the following screenshot.

Gerrit - Prepare Push Modify Set up to Gerrit
You need to review the changes in Gerrit before merging them into the principal. The changes can exist synchronized that have occurred in the master. Utilise the following command within the branch that yous have been working on.
$ git pull --rebase origin master
-
The above command will fetch the changes or commits from the remote branch and rebase the commits on pinnacle of the master.
-
When you are done with the changes and rebased the commits, you tin can push your modify set up to Gerrit for review.
-
Git pull --rebase is often used when changes exercise non deserve a divide branch.
-
Git pull is a combination of git fetch and git merge; where equally git pull --rebase is a combination of git fetch and git rebase.
First, run the command every bit git pull origin master as shown in the following screenshot.

Now use the command as git rebase master to rebase the commits equally shown in the following screenshot.

Gerrit - Push Your Modify Set up to Gerrit
Y'all tin can submit the patches for review by using the git-review command. The change gear up can be pushed to Gerrit, by running the git review -R control as shown in the following screenshot.
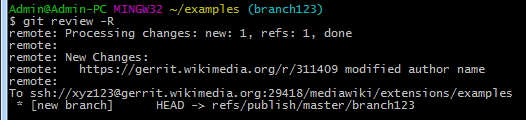
The -R option informs git-review not to consummate rebase before submitting git changes to Gerrit.
You can submit the code to other branch rather than the master, using the following control.
git review name_of_branch
Information technology is also possible to submit the code to a different remote, using the following control.
git review -r name_of_remote
Gerrit - View the Modify / Next Steps
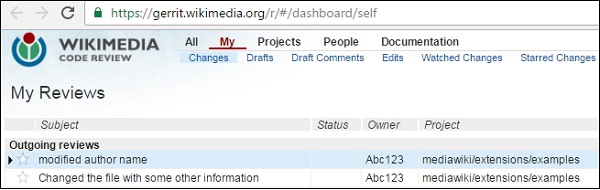
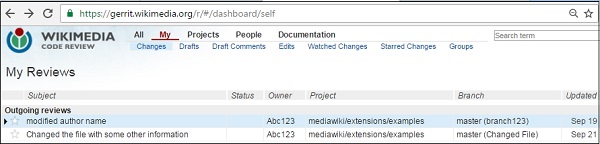
The changes can be viewed in Gerrit dashboard past clicking in this link.
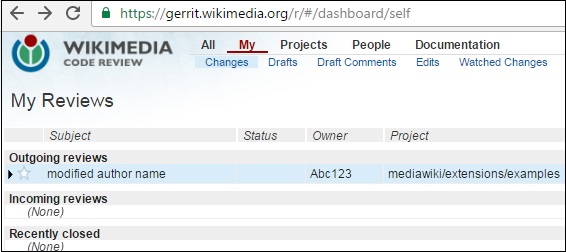
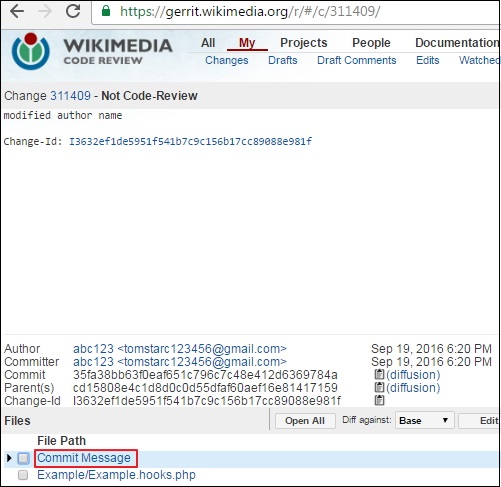
Click the modified writer name link, and yous will get the following screenshot.
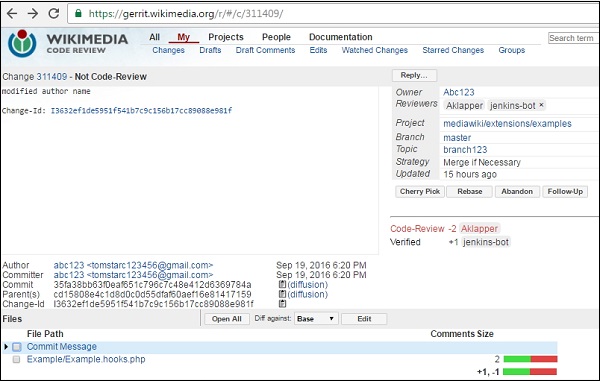
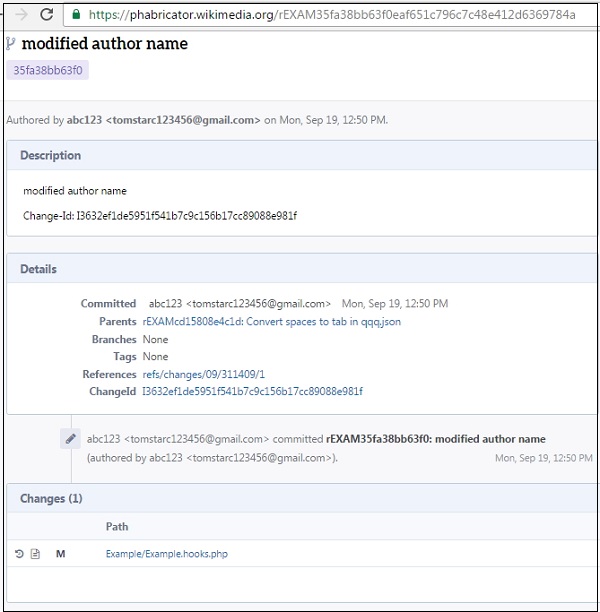
Click the diffusion link to see the changed files with other details as shown in the following screenshot.
Gerrit - Editing via the Web-Interface
You lot can edit the project via the spider web interface after logging in to the Gerrit account every bit shown in the following steps.
Step i − Get to Gerrit dashboard by clicking this link. You lot will get the following screenshot.
Step 2 − Next click the mediawiki/extensions/examples link specified under Project column.
Footstep iii − Click the General link in the toolbar as shown in the following screenshot.
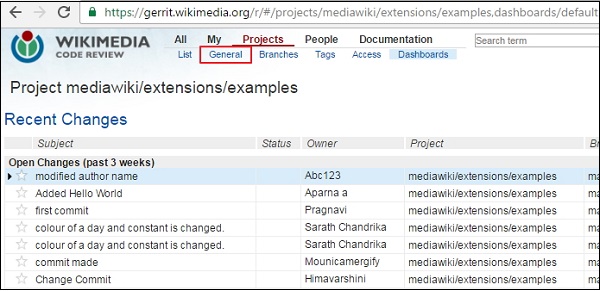
Stride 4 − When you open the General link, information technology will testify a screenshot as the post-obit.
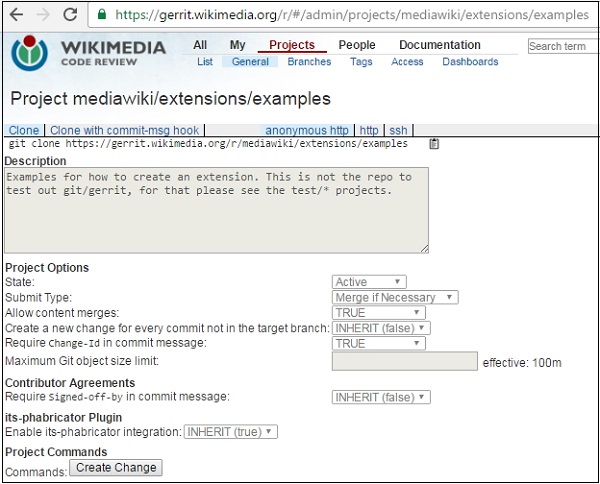
Step 5 − Click the Create Change button and it will open a popup window with some details equally shown in the following screenshot.
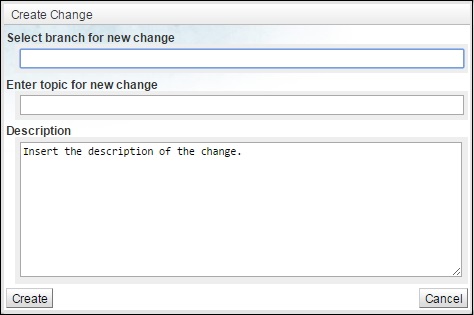
Step 6 − Enter the information and click the Create push.
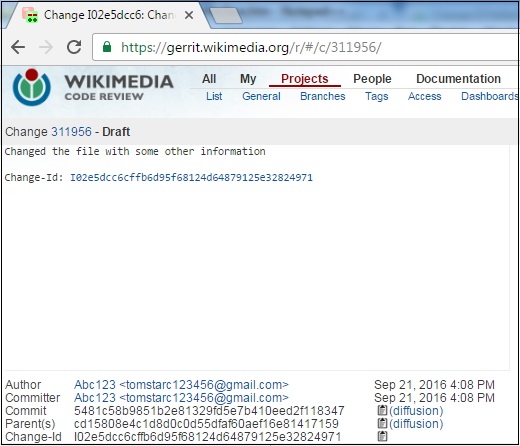
After creating the change, information technology will brandish the information equally shown in the following screenshot.
Footstep vii − Click Edit and and so click Add. Now select the file you want to edit. Here we accept selected the file Example/i18n/en.json .

When yous open the file, information technology will prove the json data as specified in the following screenshot.

Step 8 − Click Salve and so click the Shut button.
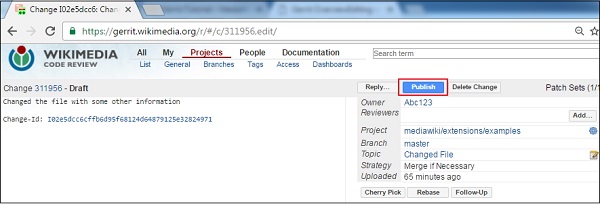
Step 9 − Finally click the Publish button to publish the edited file
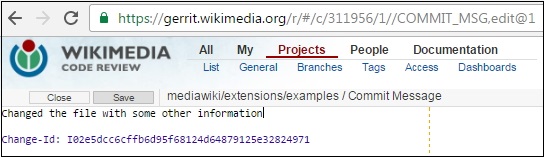
Step ten − You can change commit message past clicking the Commit Message link every bit shown in the following screenshot.

Step xi − Press due east on the keyboard and add some extra information, if yous wish to Click Save and so click the Close button.
Gerrit - Review earlier Merge
Code review is an important office of the workflow in Gerrit. The bones concept is that the code must be reviewed before beingness merged.
The workflow of the lawmaking for MediaWiki tin be reviewed earlier merging it and also extensions can be reviewed which customizes the MediaWiki looks and works. In that location is one special case in which you can button the internationalization and localization commits.
You can push all the commits to a remote co-operative when you finish the development. Someone will fetch the changes into local and merge those fetched changes into the local master by creating merge commit. You can push these changes to refs/for/master .
Gerrit - Projection Owners
Projection owner ways that the project belongs to the person mentioned. Projection owners is a virtual group in which y'all cannot add members or other groups in it. The project possessor provides access rights to allow permission on the project to different groups.
You lot tin view the access rights of your project using the post-obit steps.
Step i − Open up Gerrit dashboard by clicking this link.
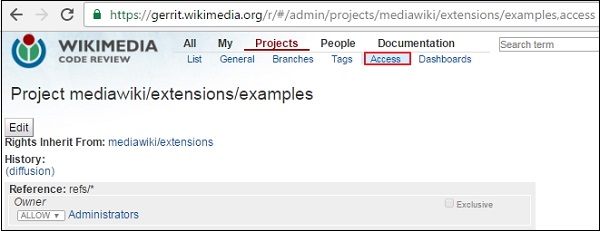
Step ii − Click Projects → List option. Search the project in your project list and click it equally shown in the following screenshot.

Step three − When you open your project, click the Admission pick every bit shown in the post-obit screenshot.
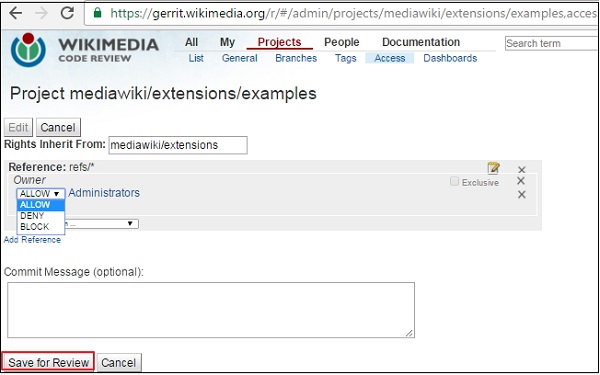
Stride 4 − Click the edit option. You can change the access rights by clicking the dropdown menu. Click the Salve Changes button as shown in the following screenshot.
How to Comment, Review, and Merge
Anyone can review the lawmaking and annotate on the code in Gerrit. Consider the following steps −
Step i − Login to Gerrit to open the Gerrit dashboard as specified in the previous chapter.
Step 2 − At present, click any field of study which contains Gerrit project, branch, updated date, etc. as shown in the post-obit screenshot.
Step iii − Adjacent, it will display a screen. Click the Commit Message option as shown in the following screenshot.
The of import fields of the change set are like Reviewers, Add Reviewer, Side-by-side off, etc. Comparing patch sets includes selecting the old version history listing, expanding the newer patch set details, etc. Reviewing and merging or rejecting the lawmaking includes abandon alter button, submitting patch button, etc. which are not present in the current version of Gerrit.
Source: https://www.tutorialspoint.com/gerrit/gerrit_quick_guide.htm
0 Response to "How to Push a Code to Review in Git Gerrit Repo"
Enregistrer un commentaire